Tuesday, November 26, 2013

Insert Graphic of Crazy Person Running in Circles


Ahhhhhhhhhhh!!!! (See Shams running in circles in a manic frenzy...)

I am definitely feeling happy/manic/excited.

I really love this time of year, but let me get a bit more specific about what is rattling around in this headpan.

  • I am eager to sew! I have to keep reminding myself that I am a tech writer and I need to write. Technically. ;)
  • I am planning to sew ALL FOUR days of Thanksgiving break. WOOT!!!
  • My eldest daughter returns from university this evening and she and I are hanging tomorrow (Wednesday) evening. So.excited. She accused me of not being that excited but she was trying to text me while I was sewing on binding and was hyper focused.
  • Youngest daughter has been in Jaipur, India for about a month now. She is teaching and learning and loving the experience. She will not be coming home for Thanksgiving or Christmas or her birthday or spring break. But she's doing what she wants to do and I am happy for her. (She will be spending Christmas in Thailand and she seems to be missing South Africa far more than San Francisco.)
  • I bought the Silhouette pattern for the jacket that won first place in Marci's contest. Since then I have watched a few of the Silhouette webcasts. Peggy seems like a nice, down to earth, self deprecating, sort of person. Her webcasts are an especially nice distraction when hand sewing. ;)
  • I am finishing up a Burda coat. This is a downloadable pattern that was brought to my attention by Elizabeth. She said she was obsessing over this coat and, as soon as my eyeballs landed on it, so was I. I was planning to blog about mine after she blogs about hers, but she seems to think that this week is to be spent with family and friends, or some such thing. So we'll see if I can wait that long. ;)
  • My e-friend Patti F sent me a box of Burda pattern magazines, mostly from 2006. I had a lot of fun going through them and identifying some things I want to make. Thanks, Patti! (I am excited that I get to meet her in the flesh in 2014.)
  • I am teaching/leading a (private) 3-day workshop this coming January. This is a first for me and a Big Deal. I have things I want to work on/prepare. I hope I have enough time to get it all done!

But mostly, I want to sew. ;)

And thanks for your kind feedback on my Mindi skirt!

Friday, November 22, 2013

Style Arc Mindi Skirt


My latest Style Arc order arrived this week and, after mulling it over, I decided to start with the Mindi skirt. This pattern is designed for a regular woven fabric, but I used a stretch woven corduroy from my stash.

Because the fabric is busy, I left off the zippered patch pockets. The front features a Center Front zipper and I used a bold Riri zipper in red.

I purchased my usual Style Arc size for bottoms - a 6. The skirt was too small through the waist so I increased the waist and substituted a rectangular waistband for their curved waistband. The skirt was too big through the hips, probably because it is designed for a regular woven fabric. I removed 4" from the side seams (1" from the front and back pattern pieces). After the skirt was completed, I realized that I could have removed another 3" or 4" from the hips, but the waistband was already attached, so I am leaving it, for now.

The pattern is designed so that the zipper goes through the waistband but I don't need that feature, given my hip-to-waist ratio, so I simplified.

This is a great basic skirt! I am already planning another one, next time with the zippered pockets, but I don't have the necessary zippers in stash.

I have enough of the corduroy left to make a pair of fun winter pants. Those will be appearing soon. ;)

Asymmetric Stripey Vest - Vogue 8954


Happy Friday!

I actually completed this piece last Sunday night, but am just now getting around to blogging it. We've (finally) had some rainy weather this week, and it gets dark so early, and it's so cold, that I haven't been as gung-ho about taking selfies.

I was eager to try Marcy's new vest pattern, Vogue 8954, but it took me awhile to settle on a fabric for its maiden voyage. Marcy had mentioned, in her blog post about this vest, that she had made a striped version out of a rayon lycra fabric, so I decided to give that a try. This rayon lycra has been in my stash for awhile and I believe it was purchased locally. It features a very uneven stripe pattern. To be honest, I haven't been in the mood to sew droopy rayon lycra knits lately, and this one is droopy, so I thought it might be a good way to use a fabric that might otherwise languish.

Marcy recommends that, if you want the vest to be less loose, to go down one size, but no more than that. I went down one size and made the Small. It is plenty roomy in the bust, so I did not do an FBA.

I made no alterations to the pattern.

You cut each pattern piece out once, alternating the direction of the stripe, and there are quite a few pattern pieces. For example, there are four pattern pieces on the left and right fronts (which are different from each other). Some of the seams are sewn conventionally, and some of the seams are sewn with reverse French seams, with the seam allowance to the outside. On each front, the top and bottom pieced seam is sewn with a French seam, but the middle seam is sewn conventionally. I serged the raw edges of all "conventional" seams.

This fabric is very lightweight, very unstable, and prone to rippling. Marcy recommended a Sulky product on her blog called Totally Stable Iron-On Tear-Away Stabilizer Roll.

I ordered some Totally Stable, and proceeded to cut many, many 1" strips with my rotary cutter, using the instructions that Marcy posted. I sewed most every seam and hem with this stabilizer, and it worked like a charm. You might be able to achieve the same results with regular paper, but I will definitely be ordering more of this product for my stash.

My little garbage can was full of used-up Totally Stable

Once the vest was finished, I decided that I liked it better open, so I did not use any closures. It has such an interesting front when worn open, with the different angled pieces that hang down, at least in this fabric.

I like this vest, and I was happy with sizing down one size, but there are a couple things I would do differently next time:

  • If I were to make it again in a droopy fabric, I would eliminate the collar. It's difficult to get the collar to lay nicely in a droopy fabric. I think that the collar would be great in a more substantial fabric. (It would be extremely easy to leave off the collar._
  • Given that I wear this open, the one serged seam on each front shows, which I don't love. Next time, I would sew all three pieced seams on each front with a reverse French seam.

And, by the way, did you SEE the entries in Marcy's recent jacket/coat competition???!!!

Ay Carumba, they were FABULOUS! Go and enjoy the visual feast...

I have another garment to show you, but no pics yet. I hope you have a great weekend!

Sunday, November 17, 2013

Miscellaneous and Sundry


Happy Sunday evening! (Or Monday morning, if you are in Australia...)

I have managed to finish two projects since Friday, but I can't show them quite yet. One is a Christmas gift, so it will have to wait a bit. That project involved a trip to the big box hardware store, which always makes me happy.

The other newly completed project is a garment for me, but I finished it after dark, so no pictures yet.

I am now waiting for inspiration for one project (dither dither), and supplies for another.

I received my latest Style Arc order yesterday, so I sat down this evening to peruse the new patterns. I really love the Ziggi moto jacket, though I haven't identified a fabric for that one. At any rate, I can't start it quite yet. There was an error with the first batch of patterns that they sent out and, a day after shipping the first copy, they emailed saying that a second copy was being mailed that corrected the error. A costly mistake for them, but I am impressed at how quickly they remedied the situation.

By the way, I saw on the Style Arc Facebook page last week that they now have cheaper international shipping! That will be very welcomed. They are also selling several colors of stretch bengaline. I just love the stretch bengaline that they sent me as my free gift for joining their pattern club over a year ago - I've been "saving" it. They are evidently selling out of colors very quickly. I have never seen stretch bengaline in this country to equal the quality of what they sent me over a year ago. (It is similar to a ponte fabric, but slightly ribbed, like a faille, and the stretch goes in the width, so you cut out your project in the cross grain direction.)

Doublestitch asked, in a comment on the Queen of Dithering post, if I would be willing to do a sew-along for the Ziggi. I'm not really a sew-along kind of person, but if there is general interest, maybe I could post some in-progress posts when I make my version. (Though I don't usually do that either, as in-progress posts aren't my favorite to read, as a rule.) Let me know, in the comments, if you think it might be worthwhile.

On Saturday, I attended (and worked at) an all day Harvest Festival and was wearing my latest Koos ensemble. While working a quiet shift as a greeter, I checked my iPhone and I saw that KOOS VAN DEN AKKER (his caps) had "liked" my photo of the very same outfit, which had been posted on the Stonemountain and Daughter Facebook page. You can see the proof of his "LIKE" in the following photo.

How cool is that?

Of course, I have no idea if it was Koos himself, or one of his assistants managing his Facebook account, who liked the pic, but it made me smile.

And speaking of Facebook, Emma One Sock now has a new Facebook page. For some time now, Marcy Tilton and Gorgeous Fabrics have one, too. It's a great way to keep abreast of developments and sales with your favorite vendors, like Pam Erny of Fashion Sewing Supply.

Happy week! I hope to have a new garment to show you soon, but these short winter days make taking selfies trickier.

Sunday, November 10, 2013

Skinny Pant Goodness - Vogue 1378


You may recollect my excitement at some of the new Vogue patterns. Specifically the new Donna Karan seamed skinny pants.

The pattern arrived Thursday afternoon. I cut the pattern tissue Thursday evening. I cut the fabric Friday evening. I sewed most of the pants on Saturday. I would have finished, but I also ran to the fabric store, met a friend for a two-hour lunch, took a class at a local ribbon store, and finished reading the second of two books since Friday evening.

In other words, these pants are a fairly quick sew!

This pattern comes in sizes 4-20. (Thanks for the smaller sizes, Vogue!) I like a close fit so, even though my 34" hips indicate that I should sew a size 10, I cut out a size 6. The pattern calls for "rayon spandex or cotton spandex" and you need it to be somewhat stretchy. The envelope describes the pants like this:

Tapered, below waist (front) pants have seam detail, overlapped lower sides, and topstitching. Close fitting, no side seams.

The pants are constructed with lapped seams, so the raw edges show on the front. Therefore, you want a doubleknit for the pants, but it needs to have some stretch to it. Right now my stash is fairly low on bottom-weight double-knits, such as ponte, so I used my favorite fabric for testing pants, some black ponte. (And my stash on that is getting low, too!) I'm sorry that it is harder to see details in black.

Constructing the lapped seam

Besides the interesting seaming on these pants, the hem is interesting. There is a vertical opening on each leg. The opening is embellished with 4 rows of topstitching. If you wanted to sew these pants with conventional seams, you could do that, however there is one inset corner that would be a bit tricky. In an overlapped seam, this is very easy. (If you are comfortable with sewing inset corners, it would not present a problem.)

Constructing the lower leg

Completed legs

These pants have no side seams and no pockets.

I made no alterations to these pants, save two. First, I made a flat butt adjustment and shortened the crotch length. Second, I am 5'5" and they were quite long in the leg. They have a 1" hem; I cut off 3.5" from the bottom before finishing with the 1" hem. The resulting vertical opening is shorter, but it is fine. However, if you were much shorter than I am, you might want to remove at least some of the length from higher up, so you wouldn't lose the opening entirely.

I wore these out this morning and I am loving them! I do not want to take them off. I can see making them again, and maybe using regular seams. A great pattern!

I very much enjoyed the class I took at the ribbon store, though I was kind of all thumbs for quite a bit of it. Sandra Ericson, of Center for Pattern Design gave a class on creating woven beads. Sandra describes it as a Swedish technique (often done using birch bark ribbon) but it was very origami like. I need to practice more on some cheap paper before locating some nicer supplies. I hope to show you more later.

More Pictures

Is that a teal thread?

Got it!

Pattern

Thursday, November 7, 2013

The Queen of Dithering


No question about it, I am the Queen of Dithering.

In fact, one of the hardest aspects of the FM competition was that I had to *quickly* make a decision for each week's challenge. That is not easy for me and I constantly second-guess myself.

Right now, I am feeling positively overwhelmed with exciting potential makes.

First up, I have a couple Style Arc patterns winging their way to me. Have you seen the Ziggy moto jacket? Have you SEEN it?!

Oh Chloe, you little vixen. You have seduced me utterly.

Michael Kors has a RTW moto jacket very similar to this for beaucoup bucks. I like the Mindi skirt, too. ('Cause everything is better with zipper pockets!)

The fact that Style Arc patterns fit me out of the envelope better than any other brand (with fewer alterations) is just icing on the cake.

Then, I have several patterns winging to me from the last BMV (Butterick McCalls Vogue) sale. I already blogged about my favorites (as well as pointing out some wasted opportunities) from the latest Vogue release.

Then, Margy is kindly loaning me a copy of an OOP pattern that I covet, also flying my way, as we speak. (I have it in my former size, but not my current size.)

Then, I bought a vintage pattern. An expensive vintage pattern. I will not admit what this pattern cost, but I believe it is more money than I have ever spent on a pattern.

<ahem>

I have some gorgeous teal wool crepe, gifted to me by the incredibly generous Rhonda Buss, that I would like to use for this pattern. However, the yardage is a tad short. I hope I can "make it work", because this fabric really wants to be this pattern.

Finally, several weeks ago I was in Goodwill (thrift store), looking for cute belts to fit me (always a challenge). Instead, I spied a coat. A really cool coat. One of the coolest coats I have seen in awhile. It was a size 55, which Margy later tracked down to Korean sizing and equivalent to a U.S. 4-6. I can just barely get my arms into this coat. I had to buy it ($30), because I hope to replicate it in my size. It will be a lot of work, but this coat is worth the trouble.

Dither dither.

I hope to sew tonight, as I haven't sewn the last two evenings. But it's a bit of a race to see which pattern arrives first!

Probably all will arrive today and then you will hear the dithering all the way from San Francisco!

Monday, November 4, 2013

Mixed Print Challenge - Koos Style!


Linking up (just under the wire) with Patti's Visible Monday!

TOC

The seventh challenge was pretty straightforward:

Using at least two prints, coordinate them to make an outfit. Use only the fabric prints you have chosen to make your pieces.

Now this challenge is right up my alley!

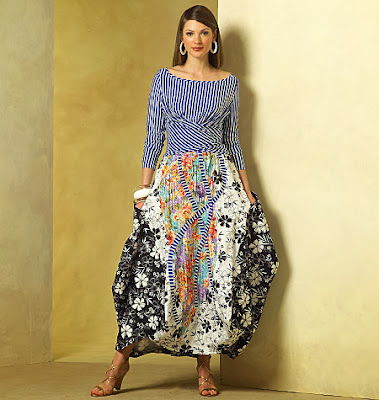
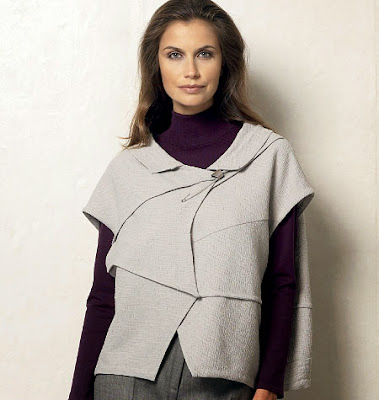
I love to mix prints. Almost immediately, I thought of a pattern that I've been wanting to make for years, Vogue 2971. It is a Koos Van Den Akker pattern released (I believe) in 2007. In fact, this pattern is now OOP. I didn't have a copy of the pattern in my current size, so Margy very kindly overnight'ed me her copy which is, ironically, no longer in her size.

I had fun last Thursday at Stone Mountain & Daughter looking for fabrics for this ensemble - though it took awhile. The wrap top calls for a 2-way knit. The skirt calls for three woven fabrics, plus knit strips - on the envelope, the pattern uses strips from the same knit used in the top. This gives the outfit cohesion, and I followed suit.

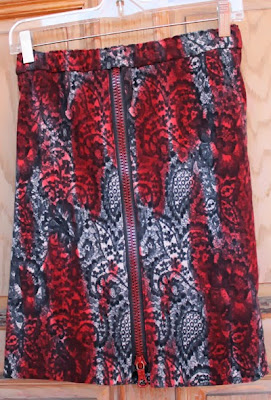
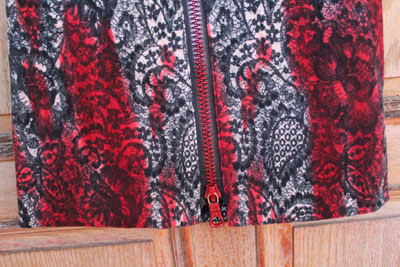
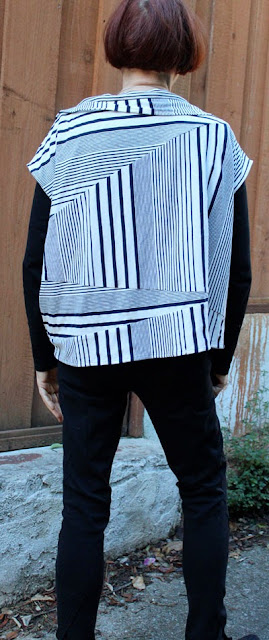
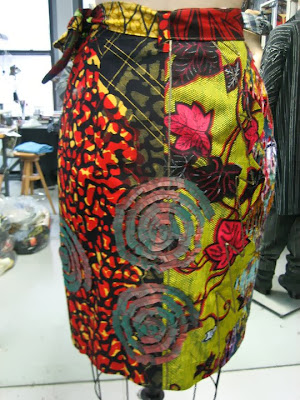
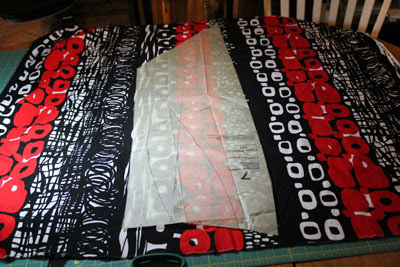
I used a striped ponte knit for the top and three quilting fabrics for the skirt. At first, I planned to use African fabrics for the skirt, but I couldn't find three that were quite right together. I then looked at the batiks and had the same problem. I finally found the black/white/red Alexander Henry print that I used for the central applique, and that became the focal point for the rest of the black and white fabrics.

Koos Van Den Akker

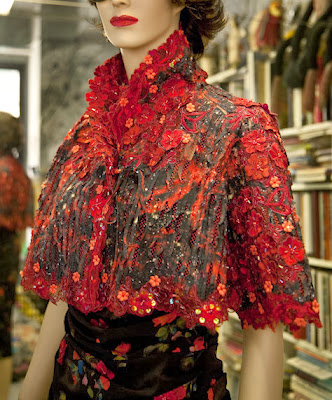
I love the work of designer Koos Van Den Akker!

Born in the Netherlands (Dutch printed fabrics are some of the most beautiful in the world), Koos may well have absorbed his print mixing tendencies in utero. He has been living, and creating, in New York City for many years. In fact, he was famous for designing the wild sweaters that Bill Cosby favored in The Cosby Show back in the 80s.

But that is old news. Koos is actively designing clothing that can be purchased at his NYC boutique and some of his designs make their way to Vogue patterns. I've been a fan of his Facebook page for a long time now and it is choc full of photos of his recent work. (He also has a website.)

Koos is absolutely fearless about mixing prints and textures. He also loves to manipulate fabric to create new textures. Here are a few recent examples of his work:

Two of my favorite makes are Koos patterns. (Clicking each picture takes you to the corresponding blog post.)

Alterations and Modifications

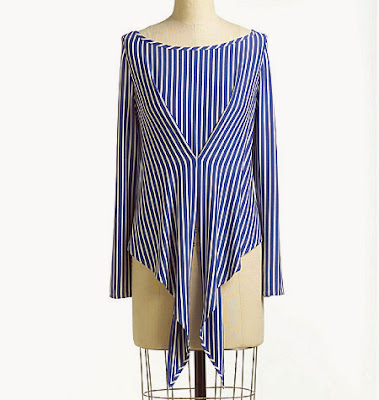
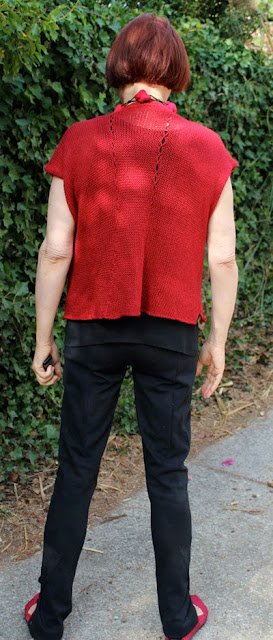
For the top, I made a size 16. The top is a bit over-sized and you might want to go down a size. I could definitely go down to a 14 and maybe even a 12 next time. (There will be a next time.)

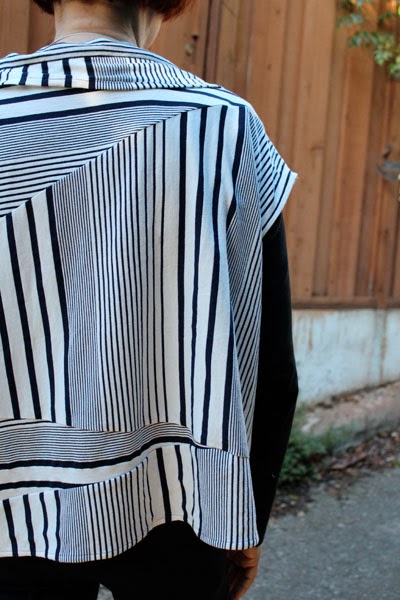
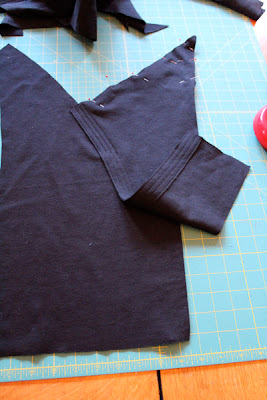
  • The boat neck is very deep and wide. When I held the pattern tissue to my body, I could see that once I narrowed the shoulder at the armscye, the resulting shoulder seam would be 1/2" wide. Far too wide a neckline for my narrow shoulders. I transferred a high jewel neckline from another pattern. After the shoulder seams were sewn, I then marked where I wanted the neckline to be (on the garment itself), and cut it down. I cut it down maybe 1-1/4" from the center front and center back.
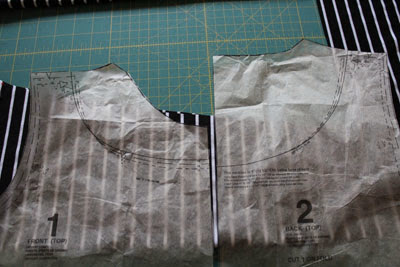
  • Changing the front and back neckline
  • I narrowed by shoulders by 1-1/4".
  • Since I changed the neckline, I didn't use the pattern piece for the neck binding. I use Sarah Veblen's neckline method and cut a 1-1/2" bias strip from the ponte.
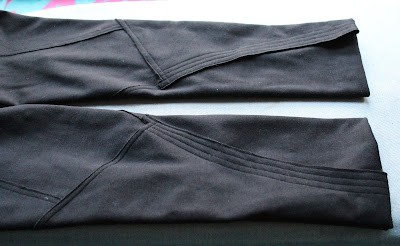
  • I do not have a tiny waist. I lengthened the ties by 8". If needed, I can always cut them down later.
  • Lengthening the ties by 8"

  • The pattern, which came out in 2007, instructs you to hem the bottom and the ties. I used a stable, non-raveling, ponte knit and didn't want that bulk, so I left the hems raw edged.
  • I did hem the sleeves. They call for a 1/2" hem, but I hemmed them at 1".
  • I did not do an FBA, as this pattern is generously cut and it was not necessary.

For the skirt, I made a size 12. My hips, according to Vogue, are a size 10. My waist, according to Vogue, is a size 18. But I measured the finished waist on the size 12 and it was about 34", which is enough ease for my 32" waist. (The hips on the pattern are far more than 34", so I was fine there, too.)

  • Given that there was enough ease for my waist and hips, I omitted the back zipper. I cut the back yoke on the fold.
  • The pattern calls for an elasticized waist. I used my own pattern piece for that.
  • I pinned the front yoke to the center front pattern piece and held it up to my body. It dragged on the floor. I am 5'5" and this skirt is *very* long. The pattern does not tell you how to lengthen or shorten it, and the pattern has a very shaped, very unusual hem, making it difficult to shorten after the fact, so I had to figure out how to shorten it before cutting it out. I first shortened the center front piece (#6) by 4".

  • The yoke front (#5) is pinned to the front (#6). I have folded out 4" of length from the front.

  • There is a little dot about 8-1/2" up from the hem on both sides of the center front (#6) piece. I had to remark that on the pattern (because it was in the area I had folded out). This is a *critical* dot, so make sure you remember to include it on the pattern, and to mark it on the fabric. (The most critical markings on this pattern are the large and small circles. Mark all of those.)

  • I had folded out the small circle, so I remarked it (the little black dot).

  • Next, I had to figure out how the rest of the pattern went together. It is *highly* non-intuitive: you are sewing straight lines around square corners six times during construction. I finally figured out that the other place I had to shorten was on the Lower Front and Back pattern piece (#12), in the long direction. However, you want to shorted 4" at the side seam, but the side seam is slightly curved. This translated to removing 3-7/8" from the vertical direction.

  • Lower Front and Back (#12), shortened by 3-7/8" in the long direction

  • I also had to shorten the front applique (#7). I had already cut it out, and I laid it on the skirt front, after attaching the front yoke to the center front. I decided to remove only 2" (despite shortening the skirt by 4"), and I removed it from the top of that pattern piece.


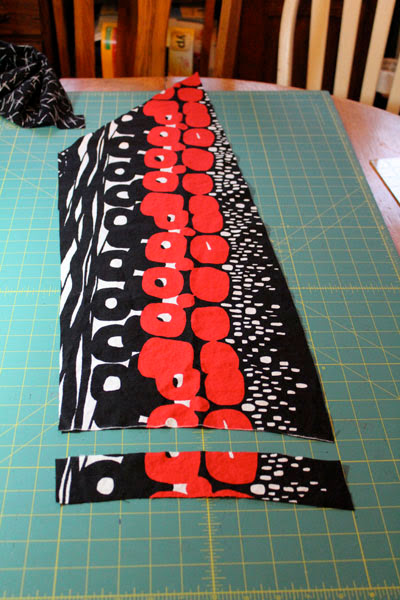
  • Removing 2" from the top of the applique (#7), which I had already cut out

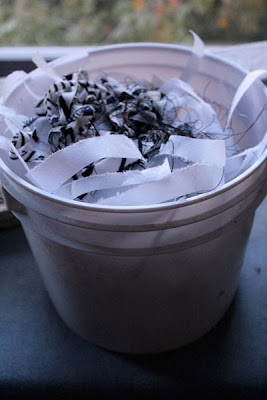
  • Finally, I had to shorten the "spaghetti" strings, cut from the striped knit, that snake around on the front applique. I cut these to the original length of the pattern, laid them on the front in my designed design, and only trimmed them to length once I had positioned them and was sure of the desired length. Each of them ended up being slighty different lengths.
  • The applique is designed to be cut on the bias. You attach it to the front after the yoke has been attached to the lower front with a gently curved seam. The bias makes it easier to work with the non-flat surface. However, I really wanted to cut the applique out on grain, so that I used the red print to its maximum effect. I managed to make it work, but it was more difficult and I don't recommend it.
  • The only other modification I made was due to a slight cutting error. The largest pattern piece, Lower Front and Back (#12), is to be cut on the fold at CB. I didn't have enough fabric to do this, so I had to introduce a CB seam.

This pattern is fairly quick to sew up. Once I had completed the alterations on the top, and matched the stripes on cutting it out, it sewed up lickety split. The skirt, while a bit mind bending on how it goes together, really isn't that time consuming either. I started this project on Saturday morning. I cut and sewed almost the entire skirt on Saturday. (I realized late Saturday, when everything was finished (including the long hem), except for the waistband, that I hadn't put on the little snakes on the front applique. That was lucky because you want to do that before attaching the waistband.) On Sunday, I completed the snakes, the waistband, the pattern alterations for the top, and made the top.

The entire outfit in one weekend, though it was after dark when I finished. Not too shabby! (I had to wait until after work on Monday to take the pics.)

Conclusion

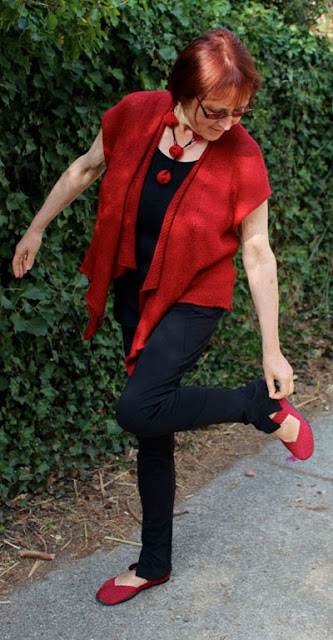
I love this outfit! I will definitely make the top again. I'd love it in solid black and maybe in a few other colors. I will have to play with a smaller size. When you put it on, it requires a bit of manipulation to get everything just so, but I think it will be fun to wear.

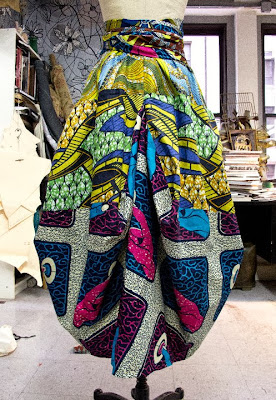
Also, the skirt is fabulous. If you are concerned about it being too dramatic, it would still be wonderful without the front applique and snakes. In fact, it would still be wonderful made out of a single fabric.

More Pictures

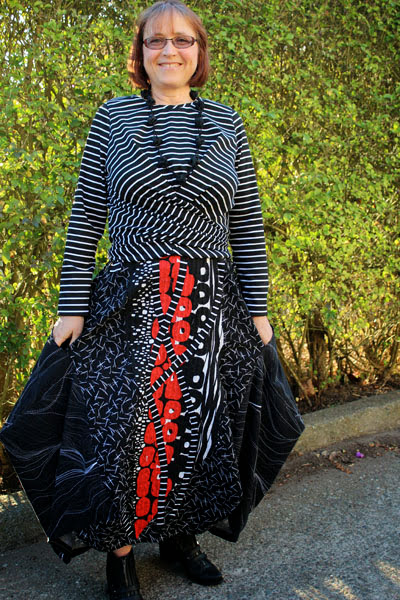
Holding out the skirt. (My fingers are in the in-seam pockets.)

Pattern

Vogue 2971