Friday, December 27, 2013

The Year is Dead, Long Live the New Year


Maybe my blogging less is a good thing, if I'm no longer contributing to blog feed clutter. ;)

I have started my new job and it's a fairly overwhelming undertaking on many fronts. So much to learn. So many classes to take. So much to eat. So much to try not to eat.

And, yes, I have gained some weight. I am working on figuring out how to deal with that. The quality and quantity of free food is mind blowing.

It's a delicious and seductive mine field.

You know what they say about how one never forgets to ride a bike?

I might dispute that.

On my second or third day of work, I realized that it would take me over 30 minutes to walk to one of my orientation classes (I am tagged with the "engineering" label, so I have many additional orientation classes to take and the campus is larger than DD1's university campus), so I decided to brave one of the bikes. The first bike I selected gave me something akin to a wedgie, so I realized I had to stick to a bike with a really low seat.

After selecting my bike from the stable, I had to immediately ride down a slope to the main road. Though "careen" is more of an apt description. I almost took out two pedestrians. Thank goodness no cars came up the road in that moment.

I was careening all over the place. It has been maybe 30 years since I was on a bike and while the skill "came back", somewhat, it took awhile. I am determined to try and ride one of the bikes at every opportunity to build up some muscles and maybe some balance.

I apologize, in advance, that I have no sewing to show today.

I did sew a skirt, right before starting my new job. But it's a rather spring-like skirt, so I have no pictures of it. Though, if this warm weather continues, I may be wearing it sooner rather than later.

When I am not working (I have no vacation yet, so I am working through the holidays), I am preparing for a (private) 3-day workshop I am leading in early January. Some months ago, I was asked to teach a workshop on jackets and, in particular, the creative aspects of jacket making. I have never done anything like this before, so I am spending my free time creating hand outs, samples, and trying to anticipate what these students might want to hear.

So that is sewing, of a sort, though I have nothing to share.

Christmas itself was a bit of a challenge. I celebrate with my daughters on Christmas Eve. (They spend Christmas day with their father's family.) This year, DD2 spent Christmas in Thailand as part of her Gap Year studies. In fact, right now she is in a remote tribal village that has absolutely no internet access - she will be there for almost a month studying sustainable farming. But right before she left, she was in the town of Mae Hong Son and we were able to Skype on Christmas Eve. I hadn't heard her voice in some months, so this was especially nice.

Given that DD2 was out of the picture, I decided that DD1 and I needed a change of pace, so I booked a night in a treehouse for Christmas Eve.

The treehouse was great. It is, basically, one room, in a tree, in the hills. You first ascend a staircase to reach the base of the treehouse. Then you ascend two ladders to the treehouse itself. But what I didn't realize is that the bathroom and the kitchen are not *in* the treehouse. That means, in the middle of the night, if you have to use the facilities, you descend two ladders and cross a small courtyard.

In the dark.

Thank goodness that we are having some nice weather. ;)

In the treehouse itself, there is a loft, which requires ascending another ladder. DD1 was thrilled to sleep in the loft, and I was quite comfy on the daybed below.

The TV is can be seen from both locations. We had brought some movies to watch and the treehouse is also equipped with an impressive assortment of movies. For example, we watched The Internship. (I have been asked repeatedly if I had seen this movie. I had not, so I decided to address this oversight.)

Christmas Eve dinner in the treehouse

The best part of spending the night in a tree house (and I do recommend it) is waking up on Christmas morning to the glorious sunrise peeking through the trees. Just beautiful.

We also ate our meals in the treehouse, which requires some dexterity to move the plates of food up and the dishes out. Thank goodness we didn't drink all of the wine we had brought. (DD1 is now 21-years old...)

Christmas breakfast, provided by our hosts
Sporting our Ugly Christmas Sweaters and other Christmas swag. My sweater features Santa on a Harley. ;)

And just so I offer you something in the way of sewing content... Kay, the Sewing Lawyer, has made a very cool Trapper's Hat pattern available. She made the hat for her son, but I think it's a style that some females would also enjoy, especially those who live in a cold climate.

2014 promises to be an interesting year. Yes, indeedy.

You can see that I patronized the company store. ;)
Happy New Year!

Thursday, December 12, 2013

Another Holiday Gift Idea


In early November, I blogged about those cool measuring tools by SA Curve Ruler. My friend Sue decided to order two sets of these tools - one for herself and one for another sewer. She bought this set and then she added another great gift, a neck lamp.

She found this lamp at Costco (in the office supply section), but it's also fairly inexpensive on Amazon: Twist-A-Lite Handsfree Flexible Neck Reading Book LED Light. She kindly gifted me with an extra one she had and it is so perfect. It will also be great if the power goes out and one has to use the bathroom. ;) My clever friend Heather puts one on her dog's neck when he had to go out in the dark.

Well, let me say that this entire gift was very popular! Much admired and coveted.

Here's another thought for you. I do a lot of hand sewing. A lot. I am fairly finicky about my needles. Margy asked me the other day what kind I use, and I thought maybe others might be interested. I like my needles to be slim and sharp, but not too short or too long. I like the eyes to be on the long side, but not fat.

What can I say, size matters.

I think that some people who hate hand sewing have maybe never used a good needle.

Maybe. ;)

I use a needle for a long time. It often develops a bit of a curve, but I like the personality.

Anyway, I really like John James needles, which are made in England. Those English tailors require good tools.

Here are some on Amazon: John James Professional Needle Collection-100/Pkg.

I am sure that Clover needles are also good (I love Clover pins and other tools) but I haven't used those. Are there any other needle brands you can recommend?

Tuesday, December 10, 2013

Badass on the Outside, Party on the Inside - Style Arc Ziggi Moto


It's finished!

Actually, I finished the jacket, after a marathon of sewing, on Sunday around 1:30pm. I was planning to wear it to an event Sunday evening, but then I put it on and I'd sewn the sleeve linings in (by hand) so that they were twisted.

Oh well! I finished fixing the sleeve linings last night.

This is a beautifully drafted pattern.

I did have to make numerous alterations, as this was the first time I purchased a Style Arc for my upper body since losing weight. I ordered a size 10, based on my high bust, and it was too small through the bust (expected), large through the hips (expected), and narrow through the back (not expected). I had to do quite a few alterations in quite a few places, including the seams through the upper back, the collar, the front princess seams. I narrowed the shoulder by about 1" (typical), but I did not shorten the sleeves (atypical). I had to slightly widen the upper sleeve (typical). Next time I might order a size 12 - it depends on the garment.

I especially like the back peplum.

I quilted the shoulder yokes and the upper sleeves. It's extra work, but the effect is really nice. (Though the effect is muted against the textured fabric.)

I lined it with a wild print.

The resulting jackets fits and is comfy. I like it!

Related posts:

Monday, December 9, 2013

Christmas Gift for a Sewist


Yes, that bow is made from a flexible plastic tape measure. :)

I actually made this project several weeks ago, but I couldn't post it until the gift exchange was complete. I made a gift for a sewist, though I wasn't sure which sewist it would go to.

After much cogitating, I found this pattern by CurryBungalow for a thread catcher, to keep by your sewing machine. It also includes a detachable pincushion.

Cute, isn't it?

I haven't been to FabMo in maybe a year, but I have loads of fabric samples from FabMo (a place that rescues supplies that would otherwise be dumped) and I always love an opportunity to use them. I have used them for making zippered pouches, tote bags, and my Koos bag, to name a few things. (You can see all the posts I've tagged with "FabMo" here.)

I decided to make two, since I could use one of these as well. (In fact, I could use two - one for the sewing machine and one for the serger station, but that will have to wait for another day.) As I dived into my bags of FabMo samples, I decided to focus on blue, as that is a color that appeals to many. The dimensions of my bags are slightly smaller than the pattern calls for (maybe half an inch in each dimension) and slightly different from each other. With the sample fabrics, you have to work with what you have and I used every inch of that lining fabric.

The pattern calls for quilting cottons and I used two kinds of fabrics. Mostly I used tapestry home dec fabrics which are much thicker than a quilting cotton, but they worked. The solid blue fabrics came from a jeans sample - several chopped off jeans legs, maybe 18" in length, were stapled together and suspended from a cardboard "hang tag". These samples demonstrated different washes/distressed finishes that were available from the vendor. The distressed fabrics were very soft. I used the denim as the trim on the bag, and to connect the bag to the weight.

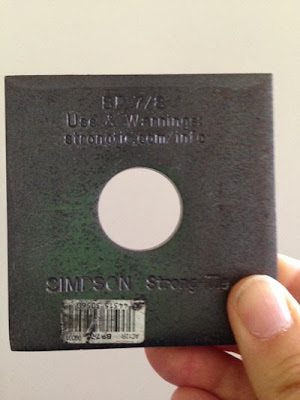
I made some changes to the pattern. For the flat weight that stabilizes the thread catcher, the pattern calls for a "subway tile". When I went to the big box home dec store (my local indie hardware store did not carry these tiles), I found that the subway tiles were not heavy enough. I hunted up and down the aisles and I found some heavy steel plates. These things are much heavier than a subway tile and each one cost less than $2.

I cut a piece of non adhesive shelf liner and glued it to the bottom of the covered weight. Because of this, coupled with the heft of the plate, it doesn't slide at all.

Because the plate is square, I made the pincushion in a square shape.

The pincushion is filled with ground walnut shells.

I also bought some flower shaped head pins to decorate the pincushion.

The gift I brought home is also hand made: a beautiful smock-style apron, with lots of pockets:

Front

Back

Kathleen, my friend who made this apron, used a pattern called My Neighbor's Apron.

Friday, December 6, 2013

Tutorial - Sleeve Hem with Zipper and Gusset


This is another tutorial inspired by the Style Arc Ziggi jacket. Previously, I wrote a tutorial on how to create the exposed zipper pockets.

The Ziggi, as with many moto jackets, features zippers at the sleeve hems. The sleeves are 2-piece sleeves and the zipper is placed in the back seam. These instructions would work with any similar jacket.


Note: Before you begin, make sure that you have checked the sleeve length and made any alterations to the pattern that are needed. It would be difficult, if not impossible, to lengthen or shorten the sleeve after the zippers are inserted. I should add that the Ziggi, like most Style Arc patterns, features a slim fit through the upper arm. You should also check the fit through the upper arm before cutting out your pattern.

The Ziggi jacket does not call for a gusset in the zipper opening, but I decided to add a zipper gusset. It's an easy alteration. The pattern calls for 6" zippers, but the notches on the sleeves indicate a shorter zipper. I used 5" YKK zippers.

No pattern is provided for the zipper facing, but it is extremely easy to create.

As you can see, the length of the zipper's teeth is 5", however, when the zipper pull is pointed down, the length from the top of the zipper to the tip of the pull is 5-1/2". Because I do not want the zipper pull to hang below the sleeve hem, I will make the "window" for the zipper at 5-1/2" long.

The zipper window is created on the under sleeve, but here I have chalked the lines for the zipper window on a scrap of lining. (The dimensions of the lining scrap aren't essential, as the excess is later cut off.) The sleeve hem is 1-1/2" wide, so the 5-1/2" window starts at 1-1/2" above the bottom of the fabric. The width of the window is 1/2" plus 3/8" (the seam allowance), or 7/8" wide.

Pin the chalked lining piece to the right side of the Under Sleeve (*14) at the back seam. Stitch the seam using a short stitch.

Trim the seam allowance to approx 3/8". From the raw edge, clip at a diagonal, right to the corner.

Turn the facing to the inside of the fabric. Baste close to the fold.

The back side.

Pin the Under Sleeve (#14) to the Top Sleeve (#12 which has been previously joined to #13) at the back seam. Stitch. Press seam allowance open, and then towards the under sleeve.

The zipper window is now ready for the zipper.

Position the zipper in the center of the window, with the top of the zipper at the top of the window. Pin in place.

Using the zipper foot, topstitch along the full length of the seam. Then go back and topstitch along the remaining two edges of the zipper window. This secures the zipper in place. In the pic above, the zipper on the right has been topstitched in place. Remove the basting thread.

Both zippers are topstitched in place.

The back. The excess lining fabric has not yet been trimmed away.

Draft the gusset, if you want to use a gusset. It doesn't have to be precise - any excess can be trimmed later. For this gusset, the top is about 1-1/4" across. The length is about 7", which includes a 1" hem. The base of the gusset is about 4" across.

Cut 2 gusset pieces out of a scrap of lining fabric. I didn't want the polka dots to show on the outside when the zipper was unzipped, so I am used the back side of the polka dot lining fabric, which is solid black and slightly crinkled.

Hem the gussets.

Unzip the zipper. Position the gusset on the back of the sleeve, right side of gusset against the wrong side of the sleeve. (When the zipper is unzipped you should see the right side of the gusset.) Align the hem edge of the gusset with the end of the zipper's teeth. Pin the gusset to the seam allowance. (This is easiest when you have a seam allowance larger than 3/8".)

Flip the seam allowance over (I then move the pins to this side) and stitch the gusset to the seam allowance, as close as possible to the original line of stitching, and using a zipper foot. Then, pin the remaining side of the gusset to the seam allowance of the other side of the zipper and, once again, stitch as close to the stitching line as possible. (The picture shows stitching the second side of the gusset. There is a bit of excess gusset fabric, but that is fine.)

The gusset is now secured.

Back side of the gusset. Note the extra fabric - that can be trimmed away if it bothers you.

Back side of the gusset when the zipper is closed.

Next, stitch the other seam between the under sleeve and top sleeve, forming the sleeve tube. (No pic.)

Pin up the 1-1/2" hem. Topstitch, beginning and ending at the zipper. (I top-stitched at 1".) This completes the sleeve.

Closed zippers. Note that the zipper pull does not hang below the sleeve hem, as designed.

When these pics were taken, I had not yet lined the sleeves on the Ziggi jacket, so I am showing the sleeve from my Kwik Sew Moto Jacket. For this jacket, I created the zipper opening so that the end of the zipper teeth line up with the sleeve hem. This causes the zipper pull to hang below the sleeve hem when the zipper is closed. You have to decide which effect you prefer.

When lining the sleeve, hand sew the lining around the zipper opening, keeping the gusset free.