Sunday, February 27, 2011

Butterick 5423 - Felted Jacket

More pics

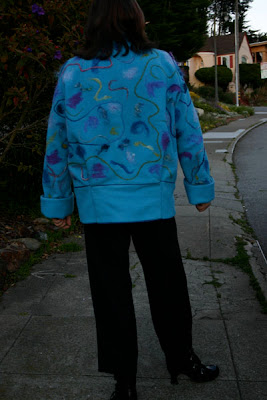
Wow, I feel like I haven't blogged in forever, but I haven't had much to share. February was a low-productivity month, between work and illness. I also have been working on more intensive projects, which forces me to slow down. However, I am glad to have finished jacket #3! Or mostly finished. I can't find the jumbo snaps I bought last week to complete this jacket, and the light was fading fast this evening, so I took the photos sans snap.

At last month's ASG meeting Ronda Chaney, head of the Fashion Department at Canada College, gave a presentation on FBAs and other bodice alterations. For February's meeting we were encouraged to work on a garment incorporating a technique that was presented.

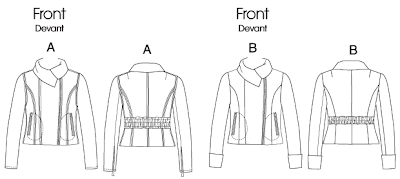
I'd been mulling this jacket pattern over for some time. I like the big band that goes around the outer edge. I like the shaped front edge. I like the opportunity to use two contrast fabrics. I wasn't sure about the dolman sleeves - it's not my most flattering look - but the opportunity to needle felt the contrast, combined with an idea from Ronda, pushed it to the top of the pile.

My "twist" on the FBA was to convert the FBA dart to tucks (or gathers) into the front band. For my thick fulled wool, I converted it to 5 small external darts, and for the silk charmeuse lining, I used gathers.

Alterations and Modifications

  • Lengthened the jacket 3".
  • Added an unconventional FBA: Created the FBA after cutting the pattern in half (in prep for lengthening). I slashed up to the bust point, then up to the shoulder notch, then slashed in from the front to the bust point (NOT to the side seam). Added a second slash from the front to the bust point, as if I were adding two darts. Angled the bottom piece back, so as not to add any more width. Then I lengthened the piece 3".

    This may not make much sense, but I've been experimenting with FBAs that won't add to the overall width of the garment below the waist. The two slashes I created at the front can be sewn as either tucks or gathers, depending on the fashion fabric.

    I think you can see my alteration here. I sliced off the bottom before doing the FBA. The added width was tapered back to the original width and then the piece was lengthened 3". I created two slices in the front which can be sewn as darts, tucks, or gathers.
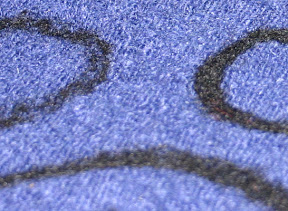
    Dart closeup

  • At the back, there is a pleat at the bottom of the band. This creates a very strange silhouette. Ronda suggested extending the tuck up throughout the band and this looked much better.
  • I added a flat piping on each side of the band at and the sleeve hems.
  • I did not shorten the sleeves and you can see they are quite long, which I liked for folding back. But the pattern calls to line the sleeves to the edge. Because I wanted the wool to appear when the cuff was folded back, I drafted sleeve facings and shortened the sleeve lining accordingly.
  • I added small shoulder pads.

Materials

  • Peacock blue wool from Fabrix, fulled in the washing machine/dryer. This fabric really thickened up, like a fuzzy wool blanket. I had been planning to use it for another project, but it was too thick after machine fulling.
  • Royal blue pebbled Vera Wang silk for lining. From FabricMart, this was left over from my Sandra Betzina Motorcycle Jacket.
  • Variety of merino wool batts, New Zealand corriedale fiber, dyed mohair locks, merino wool/silk blend fiber, and other exotic fibers and yarns, from Living Felt.
  • Giant 30mm brass snap (not pictured).
  • Small raglan shoulder pads from Britex.

Felting

Felting samples

Needle felting such a large area was intimidating. I started with the back: I sewed the darts into the back shoulder, then sewed the back together at CB. I made several samples using various fibers. I found that it worked best to tack the fibers loosely in place with a hand needle before taking it to the felting machine. It worked best to build the background in layers. Once the basic band and fronts were complete, I sewed them at the shoulder seams and continued layering. The curly mohair locks and novelty yarns were felted at the very end.

As I worked on the felting, I thought it looked bad at first, but I had faith. As I continued, my faith wavered as it appeared to become uglier and uglier. Finally, at the end, when I was adding the yarns, I decided it wasn't so bad and that I actually liked it. Being artistic requires cojones. :)

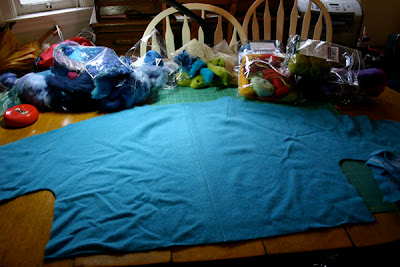
All my supplies, ready to go. Intimidated much? (Yeah, I should have ironed it first. ;) )

First layer complete. This layer consisted of wool batting in "blobby" shapes

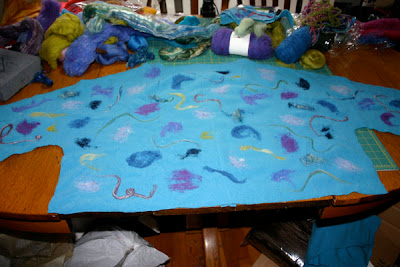
This layer consisted of a merino/silk fiber in squiggly shapes. Not pictured is the next layer, which consisted of curly mohair, loosely felted. The final layer of novelty yarns was completed after the shoulder seams were sewn.

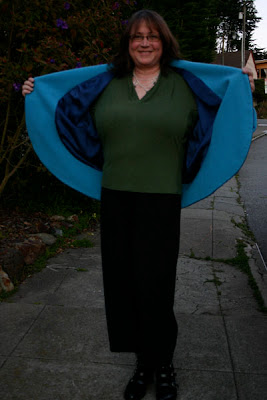
I love the contrast of the royal blue lining with the turquoise wool.

What's Next

Me-Made-March begins this week, so this weekend I moved my handful of RTW garments to a remote closet, so they won't be in my way. I'd like to create a few more pants/tops for this coming month, but we'll see how far I get. My goal of sewing coats/jackets has definitely slowed me down, as much as I love how they fill out my wardrobe. :)

As a total aside, today I spent 6 hours at a photo shoot for my daughter. I arranged for this as a graduation milestone and the photographer specializes in working with dancers in outside locations. It was fun, but WOW it was exhausting, partly because we got up at 4am to start in the dark. At the very end I asked him to snap a photo or two of my daughter and I, so I might end up with a decent picture of the two of us. We'll see. :)

I hope you have a great week!

Saturday, February 12, 2011

Vogue 1198 - Sandra Betzina Motorcyle-Style Jacket

You might remember back in November I won some beautiful boiled wool in Sandra Betzina's coat/jacket contest. The fabric, donated by Stone Mountain and Daughter, is a hard-to-describe royal blue/periwinkle color. (I first referred to it as purple, but it really is more of a royal blue.)

I decided it was fitting to make this fabric up using a Sandra Betzina pattern. I chose Vogue 1198, View B, which I'd been wanting to make since the motorcycle-inspired jacket pattern came out last fall. I also felt it was fitting to purchase the notions from Stone Mountain, who donated the fabric, so I headed off on New Year's Day to buy zippers, thread, and maybe a piece fabric, or two. ;)

I recently reviewed the Palmer/Pletsch DVD, "Full Busted?," and I applied techniques from the DVD to this pattern.

LOOK MA, NO MUSLIN!

One of the biggest tricks I learned from the DVD is how to prepare a tissue pattern so you can use it as a fitting tool. I usually do a rough fitting using the tissue pattern, and then do a final fitting in a test fabric. Previously, I found it difficult to get a good fit in tissue without ripping it to shreds. The Palmer/Pletsch technique worked fairly well. I did spend much longer than usual fitting the final jacket, but I saved the muslin stage, so it was worthwhile. I certainly knew that the final jacket would be large enough to make fitting possible and that is critical.

Supplies and Notions:

  • Royal blue boiled wool from Stone Mountain and Daughter
  • Royal blue pebbled Vera Wang silk from FabricMart for the lining. (Purchased last June, originally for another project. I bought this Vera Wang fabric in both pebbled and non-pebbled versions, but the pebbled was closer when I grabbed for it. :) )
  • Black, lightweight fusible interfacing
  • Scrap of cotton/rayon fabric for interfacing the hem.
  • 24" YKK zipper - "Brastique" in black. (The pattern calls for a 20" zipper, but I knew I would be lengthening the jacket as part of the FBA process.)
  • Two 7" YKK zippers - "Brastique" in black
  • 1/4" Wonder Tape
  • Black wool batt from Living Felt.
  • Needle felting tools (needles, foam, Janome FM725 felting machine)

Alterations and Modifications:

  • Lowered the bust fullness 4.5". (Which was a bit too much, but I was able to fix this when fitting the final fabric version.)
  • 3" Princess seam FBA.
  • After fine tuning the fit, I decided to omit the gathered back belt.
  • Narrowed the cuff 1".
  • Removed fullness at the side hip.
  • In the final fitting, I removed some of the fullness from under the bust, down to the hip, at the front princess and side seams. On the princess seam, I removed fullness from the side panel only because the bottom of the left front was already quite narrow and I didn't want to interfere with the line.
  • Though I am a huge fan of topstitching, I didn't want it for this project. The zipper pockets are supposed to secure the zipper using topstitching, but I hand picked both zippers. This also avoided any risk of needle breakage on the brass teeth of these substantial zippers.
  • At the very end, I shaved off 1/2" from each shoulder, before attaching the sleeves.
  • The first time I hemmed the jacket, I was not happy with it. It was too unsupported, so, inspired by Ann Rowley, I frogged the hem and made a proper, interfaced hem. The result is so much nicer. :)

    Interfaced hem, in progress

More Needle Felting!

Tszuj it up!

As I was working on this jacket, I had the nagging feeling that I needed to tszug it up a bit. I was pondering over various techniques when Annette, one of my favorite reviewers on Pattern Review, and who is participating in the "12 Jackets in 12 Months" sew-along on Stitcher's Guild, became inspired by my needle felted jacket.

The concept of dry felting was new to Annette, but she eagerly jumped into it with both feet, and I advised her on her first order of supplies. She was then gifted with a needle felting machine and, within a week or two, she had completed a new coat, which featured a needle felted collar. I loved the camouflage-style design she created. (The clever girl couldn't wait for her wool roving order to arrive for the coat, so she felted the collar using dryer lint created when she machine washed/dryed the brown Shetland wool.)

She gave me ideas. :)

I immediately ordered the same needle felting machine she was using, a 5-needle Janome FM725, which is for sale on many sites at a clearance price (they have to make way for newer models). I bought mine from Fabric.com, so shipping was free.

While waiting for the machine to arrive, I wanted to get started with the needle felting on my collar and cuffs. I used the black wool batt I bought from Living Felt for my last project. (It as part of their monochrome set, but one of the only colors I did not use for that project.) I played with a free-form technique using both a single needle and the 4-needle tool that I purchased after completing my last project.

I made several samples before I was ready to start on the actual garment pieces. The samples were critical to the process, because I really didn't know what I was doing, but I liked how the samples were turning out, so I felt ready to attack the actual pieces. To prepare the final collar and cuff pieces, I fused interfacing to the back and then proceeded to apply the batt in the "squiggle" free form design that I had practiced.

See? I can do things besides circles. :)

The collar and two cuffs took me an evening to felt. At the end of the evening, I had broken several needles, but the swirls of black batting were fairly securely tacked. The wool was not as "melded" into the fabric as I wanted, but I knew I could accomplish that pretty easily once the felting machine arrived.

You've heard how long it took for the felting machine to arrive, so the project languished a bit. Once it came, I was delighted how quickly I was able to meld the black fibers thoroughly into the collar and cuffs. It's such a satisfying process.

Cuff on top was hand felted. Cuff on bottom after machine felting. I really wanted to meld the fiber into the fabric and was able to accomplish that with the machine.

Finally, the jacket could be finished. But wait, work intruded with an all-weekend emergency. As soon as I delivered my part of that project, I immediately came down with some form of plague and sewing was out of the question. I am still not over it, but am functioning, thank goodness.

So I persevered and it's done! WOOT! Jacket #2 is complete, at last. :D

Wearing the collar open

OK, I've bathed, put on make up, but I still look sick. At least I hope that's my sick look. ;)

Thursday, February 10, 2011

Me-Made-March '11

I, Shams, from http://communingwithfabric.blogspot.com/, sign up as a participant of Me-Made-March '11. I endeavor to wear all handmade clothing each day for the duration of March 2011. This does not include underwear, socks or shoes.

Very little sewing here of late. I worked all weekend and then promptly got sick on Monday with a plague that really kicked my butt. I'm still down, but not out.

I'll be back. :)

Friday, February 4, 2011

Janome FM 725 - How do I love Thee?!

Finally, she arrived! My felting machine arrived!

From Ohio, to Oakland, CA, back to Indiana and, finally, to San Francisco. The UPS man showed up on Wednesday, sometime after 7pm, but I was not up to opening the box, having spent hours in the dental chair earlier that day.

I finally fired her up on Thursday evening.

YOWZA!!!!

I am in love with this machine. I had some samples I had hand felted – I had felted these as thoroughly as possible, by hand. Within seconds under the needles on the machine, they were embedded into the fabric as if they had been manufactured that way.

I can now make progress on the jacket that was waiting for this machine. I may not finish it this weekend, though. I have been pulled into a fire at work this weekend and have four meetings scheduled (yup, two per day), plus whatever work needs to happen. I can sew in between, though.

Here's a peek at my current felting project.

Don't be sad, Felt Sample! This is FUN!

I hope you have a safe, warm, dry weekend, wherever you may be!