I love fringe. Whenever I have a fabric that ravels nicely, I want to incorporate fringe into the finished garment. I can't help myself. I hear that fringe may be "out of style", but... pfffft to that. :)
Last fall I attended a local BABES meeting and a very experienced sewist passed around a sample of bias fringe. I had never heard of bias fringe, but it produces a very thick, lush trim. I was quite taken with the sample and planned to one day use bias fringe in a project. When I bought this fabric at Fabrix, I immediately saw it's fringing potential and decided to make this Sandra Betzina "jeans" jacket, using the red plaid and incorporate fringe. I made two fringe samples, using standard fringe and then bias fringe – the lush bias fringe was the clear winner.
This SB jacket has the most amazing sleeves - the pattern is worth owning for the sleeves alone. They are pieced at the bottom and gently flare out. Because this fabric is a plaid, I placed several pattern pieces on the bias. I did match the plaid elsewhere, but this made the process a bit easier and added some visual interest.

Auditioning the fringe samples: bias on the left and standard (double layered) on the right.
Fabric:
- The main fabric is a red plaid rayon blend from Fabrix for $3.99 a yard. I cut the side fronts, back fronts, the collar, and one of the sleeve pieces on the bias. I fused interfacing to the bias pieces, as well as the front facings, back neck facing, and collar.
- The lining is a poly silky from Fabrix. I purchased three red prints (at $3.99 a yard) that would work as a lining and I had a heck of a time choosing between them. After some difficult deliberation, I cut into my favorite of the three - a scarf print. I fussy cut the fabric using the scarf borders. As pretty as this fabric is, it's one of those nasty wobbly, ravelly, synthetic fabrics to sew. Luckily a lining has minimal finishing, so it wasn't too bad.

My three lining choices

And the winner is...
- The shaped sleeve heads were made from Pellon fleece.
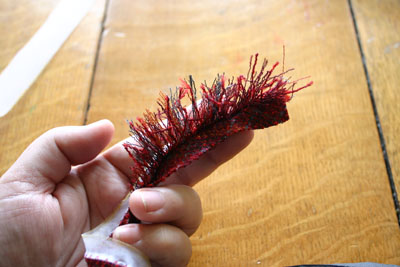
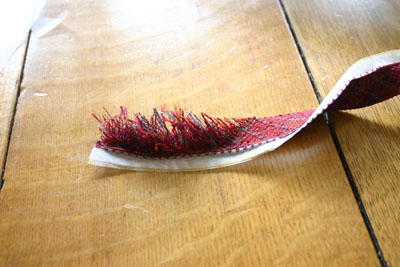
This form of fringe is rather labor intensive. If there is interest, I can post a separate tutorial on how to make it.

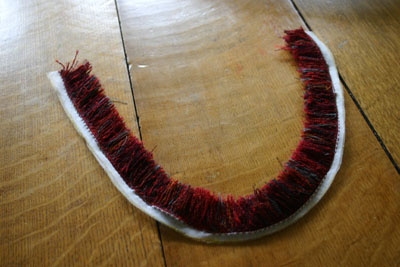
It took me several days to make the fringe for the jacket. You can see all six strips here. The strip in front has not yet been "groomed" and none of the strips have been trimmed. I lightly trimmed them after they were sewn into the jacket.
Alterations and modifications:
- Before making a muslin, I did a 2" princess FBA in the side front panel (using Fit for Real People). The remaining alterations were post muslin, which was made from an old flannel sheet with some impressive holes that I had to cut around. My DD must sleep with an unsheethed exacto knife, or something. :)
- Eliminated the waistband. The picture on the pattern doesn't show it, but the waistband is shaped and the shaping did not work on my body. It might work well for someone with a smaller waist and larger hips – more of a pear shape. Rather than re-draft it for my figure, I left off the waistband and lengthened the jacket – about 5" at CB tapered to 2" at CF to create a straight hem.
- Shortened the sleeve 1".
- Inserted bias fringe in the sleeve (between the upper and lower sleeve), and front and back princess seams.
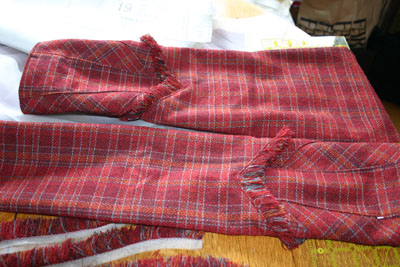
The almost-finished sleeves. (The hems are pinned from the inside and at least one pin is showing on the bottom right.)
- I sewed the side seams last, in order to add shaping at the last minute. I did end up taking it in a couple inches at the waist and hip.
- Pocket: The pocket was definitely pesky. First, I redrafted the same style of pocket as you see on the original pattern, ending it at the bottom of the jacket (just above the hem). However, I cut a size F (one of the larger sizes) and then I widened the side panel another 2" for the FBA, so the pocket ended up being so wide that it looked more like a "trench" than a pocket. This was no good. For my second attempt I drafted up a standard patch pocket, intending to put fringe at the top, and it didn't look right either, with or without the fringe. Finally, I ended up drafting a lined patch pocket that had the opening at an angle, sort of a hybrid between the first two pockets.
- Collar: At first I was going to leave off the collar, then I started thinking about the advice that women "of a certain age" look better with a collar. My next plan was to construct the collar using Louise Cutting's "boomerang" technique to eliminate bulk at the CF. (Nancy Zieman calls it the Express Collar.) I redrafted the collar, only to realize I did not have enough fabric for the resulting "boomerang" pattern piece. I ended up using the original collar pattern, and cut it out on the bias, which best fit the fabric that was remaining after all the bias strips were cut for the fringe.
- I added sleeve heads, as well as thin shoulder pads. I usually use rectangular muslin/fleece sleeve heads, but this time I used the instructions in Professional Sewing Techniques for Designers (pp. 389-390) to make shaped sleeve heads out of fleece.
- Lining: Though I shortened the sleeves 1" on the body, I left the sleeve lining alone. I prefer to have a pleat at the hem of the sleeve, but the pattern is designed without a pleat, so that extra 1" provided a pleat. The pattern had no pleat in the lining at CB, so I added a 1" pleat for wearing ease.
The finished lining. I heart this print. :)

The lining sewn into the jacket.

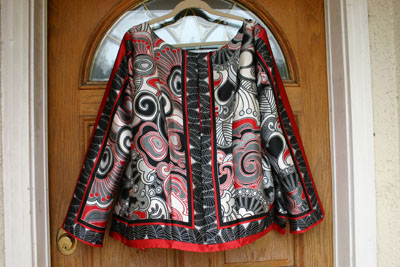
Worn unbuttoned.

Close up.

The back. I am wearing this with my beloved Marcy Tilton (V8397) ponte pants and a black, button down Vogue top with polka dots, which you can catch a small glimpse of in the close up photo.
Edited to add: I created a short tutorial on how to create the bias trim.

Vogue 1036