Friday, December 31, 2010

Au Bonheur des Petites Mains - Coat with Round Collar (10011)

Let the Year of Twelve Coats and Jackets Commence!

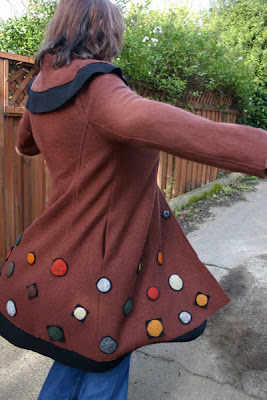
#1: Au Bonheur Coat with Round Collar and Needle Felted Embellishment
More pics here

I was excited about this coat when it came out a couple months ago. I was doing an Au Bonheur order for some friends at the time, so I took the opportunity to buy a couple for myself and this was one of them. I especially liked the princess seams and silhouette of this coat, but the circle embellishment also gave me ideas.

This multi-sized pattern contains sizes 36 to 46. Size 46 is about 6 inches too small for my bust, so I did a whopping 3" princess seam FBA. I made no other changes and sewed it up using another castoff floral curtain from my daughter's room.

I was happily surprised that it fit quite well with no other alterations. It was a bit long in the sleeve, which is typical for me. But this pattern is beautifully drafted, even if the instructions are in French, skimpy, and rather vague where clarity is most desired.

For the fabric, I ordered some wool-blend boucle from Fabric Mart. I was surprised to see that this fabric is very similar to the boiled wool I won in Sandra Betzina's contest last month. It's a fine wool knit that has been fulled - it is technically a knit, but a very stable knit. And, just like the fabric from the contest, it has a wonderful drape. This fabric was a joy to work with and you might want to buy some before it's all gone. :)

To pre-treat the wool, I used the pre-shrinking technique that Pam features on her blog, Off the Cuff. Basically, I threw both boucle fabrics into the dryer with a large wet towel. It's best to use an older towel that has minimal lint because you don't want the lint to become embedded in your wool. I dried it for 40 minutes. A great, easy technique, and you should check out her blog for more information.

Materials:

  • Wool-blend boucle (60% wool 40% rayon) in burnt sienna and black from FabricMart
  • black fusible interfacing from Fabrix for the buttonhole placket and facings
  • Merino Cross Felting Batts from Living Felt Felting Supplies
  • Felting needles - size 38 - and foam, also from Living Felt
  • Set of circle cookie cutters in graduated sizes (from ebay)
  • Black embroidery floss
  • Black 30mm sew-in snaps

Needle Felting

After the coat was constructed, I needle felted the circles using cookie cutters as templates. The original pattern used sewn felt circles but I was happy to find an excuse for needle felting. If you go to youtube and search for "needle felting cookie cutter" you will find examples of the technique.

Needle felting supplies

Auditioning the wool batting

In progress. The needle felting took me one full day. Sewing the circles on took me most of another day.

I used the two smallest cookie cutters as templates and 11 different colors of batting. I felted circles onto scraps of black boucle and then trimmed them with either a round or a square border and affixed them to the coat using a combination of the running stitch and the back stitch. In the end, I made 32 circles in the two sizes. This part of the construction is left up to you. The pattern directions are "Customiser le bas du manteau selon vos envies" or "Customize the bottom of the coat according to your wishes."

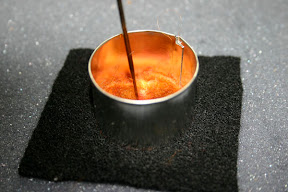
Felting inside the cookie cutter

Finishing the felting without the cookie cutter.

The back side. The fuzz on the back gave the piece some dimensionality when I sewed it to the coat.

When it came to the button treatment, I originally planned to buy buttons from Britex. In the end I decided to use needle felted circles as faux buttons. I had plastic rings in several sizes (the cookie cutters were too large) and I made several samples. Once I found the right size, I made up five "faux buttons." The coat is closed with 4 30mm black snaps that I secured with 3 strands of black embroidery floss.

Working on the faux buttons, which are smaller than the appliques

Other Construction Notes

  • In the process of translating the instructions, I added a couple more phrases to the French sewing glossary.
  • This pattern has no pockets. I added in-seam pockets.
  • The coat is unlined. I spent time debating whether to line it, but the fabric reminded me so much of a sweater knit, with its wonderful drape, I decided to maintain the feeling of a sweater coat and left it unlined.
  • Because this is a fulled wool, the edges can be left raw. The hem and the collar have raw edges. The black contrast was laid underneath the brown wool and held together with a running stitch. I sewed it once with matching thread and then again with 3 strands of contrasting black embroidery thread for a decorative effect.

    Closeup of the contrast embroidery

  • I also used 3 strands of the black embroidery floss to sew on the giant snaps. I took pains to make the stitches as even as possible.
More pics!

Here's to an excellent 2011 for each of you! Stay safe, warm, dry and healthy. :)

Thursday, December 23, 2010

Merry Christmas!

My sewing productivity has really suffered the last week or so. I've started a muslin for a coat, but have spent most my recent evenings cleaning house, wrapping gifts, organizing, and making a necklace or two.

I hope each of you who celebrates gets to spend the time doing whatever you like best. :)

Saturday, December 18, 2010

Holiday Luncheon, Year of a Dozen Jackets, and More!

Too much of a good thing? Nah. ;)

Hot off the presses... or what I wore to the ASG holiday lunch:

  • Santa Hat with double points. Ravelry link and blog post.
  • My latest Teagarden T. I think this is #8. This time I used Lipstick Red Ponte from FabricMart (no longer available).
  • Another skirt inspired by RTW. This one is made from a plaid cotton homespun fabric from Fabrix. I trimmed the bottom of the skirt with the beautiful selvedge and I frayed the bottom of the yoke. This fabric loves to fray, but since the design details are mostly lost in the plaid, I'm not sure it was worth the effort. :)
  • A felted balls necklace (worn quadrupled as a bracelet) in holiday colors.

Hari Scarf

I also finished another scarf. I just loved the "Stegosaurus points" on this Hari pattern. In fact, I was a bit sad when I blocked the scarf and they mostly flattened out. I followed the instructions in the pattern to bring them back, though they weren't quite as prominent as before. This superwash wool is so soft and the design is wonderfully funky. I will enjoy wearing it this winter.

Pre blocking

Post blocking

What's Next? A Year of Jackets and Coats!

For me, Christmas is over, or at least Christmas projects are over. That means it's time for some serious end-of-year projects. I am really looking forward to the week I have off between Christmas and New Years and I have lots of ideas to keep me busy.

I was very excited when Marcia, a member on Stitcher's Guild, suggested A Jacket a Month for 2011 and I jumped on the bandwagon right away. This idea was inspired by Gigi who did this very thing this last year. I started reading her blog halfway through the year and was very impressed by her goal and her constant progress towards achieving it.

The rules for this group sew-a-long are very flexible and I made sure that coats were also acceptable. I already have more than 12 coats and jackets planned. It will be interesting to see what I can get done between now and Dec 2011.

If you are interested, come join us! It's free to join SG and there are wonderfully supportive and knowledgeable folks there. It will be a lively group. :)

Friday, December 10, 2010

Full Metal Holidays

Huh? Where am I?

It feels like it's been years since I've done any sewing. ;) This has been a very busy week, including a holiday luncheon/team building day for work. To that event, I wore my Santa hat which is a copy of one that Penny wore in last year's Christmas episode of the Big Bang Theory. I am a geek and I like that show. :)

You can find all the details of the hat on Ravelry. Search for "Penny's Hat."

This weekend is all Nutcracker, all the time. DD1 has four performances and I will be attending two of them so I can see both of her "major" roles. It's only Friday and I'm already tired for Monday.

Off to make some fudge. Think I will get any sewing done tonight or, indeed, at all this weekend? Somehow, I will manage to sew a bit, as I have deadlines! :)

Sunday, December 5, 2010

Felted Necklace - Greedy Gift Grab

Well, it's that time of year again. It was time to make (or buy) a gift for my sewing group's holiday party. The party was last night (and so much fun!!), so I can now post pics of what I brought.

I wanted to do something very different from last year, so I tossed around many ideas. I ended up making a necklace with elastic and felt balls. I have seen this sort of thing sold in boutiques – made by a couple different designers. It's nice that you can wear this piece different ways or even layer them if you have more than one.

So, what goody did I bring home? I received a beautiful silk scarf. (And when I say "I received", that is a euphemism for "I stole" this sought-over gift. :) ) I had never seen such an interesting design before. It's very much like those "water snake" tube toys that were popular a few years ago.

Except this is made with gorgeous silks. :)

Turns out this is available as a Vogue pattern. Somehow I'd never noticed this one before. It's Vogue 8551.

Vogue 8551

And I realized that I never posted my beautiful gift from last year! I received a box of beautiful handmade cards. I've used quite a few of them over this last year, so I realized I should take a couple photos before they are all gone.

I really appreciate my fun and creative sewing friends. They make such gorgeous things, but none of them blog about it.

Friday, December 3, 2010

Crocheted Felted Flower

After felting

Before felting

I wanted a felted flower for my Guy Laroche Meets Thakoon holiday jacket. I found this Crocheted Felted Flower Brooche pattern and downloaded it. I made my first one using Brown Sheep worsted lambswool and a size Q crochet hook, but it came out huge. I then took some Araucania Ranco Solid sock yarn (leftover from my Swiss Cheese scarf) and a size F crochet hook. I ran it through three consecutive cycles in the washing machine (no dryer), and voilĂ !

Vogue 1211 - Guy Laroche meets Thakoon (and makes a Jacket!)

Skip to more pics here.

Last spring I spied an interesting Thakoon fabric on the Emma One Sock site. I had no idea how to use it, but I snapped up three yards. If you have never heard of Thakoon (you can read about him here and here), he is one of the up-and-coming fashion designers who has been supported by Anna Wintour, editor of Vogue magazine. I first learned of him from the fascinating movie, The September Issue.

I don't normally sew with florals, but I loved the whimsy of this fabric. Check it out!

The wood grain of the table and the gaps caused by the table leaves are visible through the fabric. That coin is a quarter.

When the fall Vogues came out, I briefly reviewed this Guy Laroche pattern. At the time, I thought it was interesting, but was unsure about the collar. I went ahead and ordered the pattern during a $3.29 sale, and it continued to marinate in the back of my mind. When it came time to choose an outfit to sew for the holidays, I decided I wanted to make the Laroche jacket using the Thakoon organza.

FBA and Other Alterations

For some reason, this pattern is available only in sizes 4-18. I don't understand why they don't grade it to the usual 20 or 22. I usually start with a size 20, especially in a more fitted design, So I knew I would have additional alterations.

I cut out a size 18, and added 6" for the bust using the Y-Dart alteration from Fit for Real People (p. 146). I then swiveled out the dart using a technique that I think I read in an article by Kenneth King in Threads, except I can't find it in my Threads archive. It works like this: you trace the side seam, then swivel out the dart, causing the pattern piece below the bust to angle past the original side seam. You then chop off the part that angles out, returning the side seam to the original location. This seems a bit counter-intuitive, but I figured that the new grainline at the side seam was responsible for the fit.

I made a muslin from two of my daughter's former curtain panels and tried it on. It worked surprisingly well, though there was a bit of gaping at the neckline, at bust level, which I decided to ease out in the final garment. Voila, dart averted.

After the muslin, I needed many alterations:

  • Widened the back 5/8" (for a 1-1/4" increase) using the Broad Back alteration, Method #3, in Fit for Real People, p. 118. The princess seam version of this alteration is illustrated on p. 119. Because this widened the shoulder seam, which I did not want, I shaved the 5/8" off the shoulder seam at the armscye, without affecting the added width to the back.
  • Shortened the jacket 4".
  • Shortened the sleeve 1".
  • Omitted both "over" collars (that was 4 pattern pieces I could now ignore :) )
  • Removed fullness from 3 back seams from the waist down (to remove unnecessary fullness from butt area).
  • Omitted the fisheye darts in the front.
  • Further tweaking of front princess seams - adding a 1/2" just under the arm to the left and right front, and then slashing the under sleeve at the corresponding position and spreading the pattern 1/2", tapered to nothing at the sleeve hem.

At this point I made muslin #2. I really didn't want to, but the alterations to the pattern were substantial and I didn't have enough of the Thakoon fabric to recut anything. Better safe than sorry! So, another curtain panel was sacrificed. This muslin looked great, so I was finally able to begin with the fashion fabric.

Materials:

  • Floral silk organza (designed by Thakoon) from Emma One Sock
  • 3 small black snaps
  • Felted flower (See how I made it here.)

Notes on Sewing with Silk Organza

After much consideration and testing, I decided to machine wash and dry two pieces of silk organza. (I was also pre-treating a solid black piece of silk organza that I was planning to use for facings. In the end, I did not use it.) I was surprised when I removed the two fabrics from the dryer and they had knotted into a ball. It took the highest heat on my iron, loads of steam, and a spray bottle of water to remove the stubborn wrinkles. Even so, I introduced distortion into the grain that caused me big headaches later. Lesson learned: next time serge the raw edges so they won't fray and tangle.

I would recommend cutting out each pattern piece as a single layer. This was easily accomplished with this asymmetric garment since there was a separate pattern for every piece I used, except the sleeve pieces.

It had been years since I sewed any silk organza, other than using it for sleeve heads and the like. I had forgotten about its unique characteristics. Organza, being crisp, is much easier to sew than its cousin, silk chiffon, but I had forgotten how unstable organza can be.

For example, after I cut the narrow long pattern pieces, such as the side fronts and side backs, and held them up, they "grew" at least 6 inches and became much narrower. I started to worry that the completed garment might not fit, despite my two muslins. So, I handled each cut piece very carefully. I would lay the pieces on the table, orient them right sides together as the seam would be sewn, pinned carefully, and then carefully hand basted, lifting the pieces off the table as little as possible. I then stitched on the machine, alongside the hand basting, which stabilized the seam. This worked very well. I serged the seam allowances. A purist would have used French seams, but I have seen serged seam allowances in high end RTW silk organza, and it was good enough for me. :)

Originally, I planned to draft entirely new facings for the fonts and hems, but because of the wobbliness of the fabric, I decided to use handkerchief hems, sewn by machine. Several more pattern pieces I didn't need to worry about. : ) However, this was only partially successful. The handkerchief hems worked well on the sleeves but it was a disaster on the primary hem. I ended up cutting off the handkerchief hem and sewing twill tape to the hem, turning it under and edgestitching. This worked better on the bias edge, so I also used it on the neckline. Even so, I'm not thrilled with some of these edges.

Construction Notes:

  • Omitted all facings, and hemmed with handkerchief hems on the edges that were straight of grain or cross-grain, or twill tape on those that weren't.
  • Omitted the main "shawl-like" collar, in addition to the over collars. This allows the very cool dart detailing on the top of the sleeve to show. I liked the little darts so much, even in the cotton voile test garment, that I put them on the outside. They would have shown through the translucent organza anyway. :)
  • I had some gaping at the neckline, at bust level, that bothered me. I ended up taking tiny 1/8" outside tucks. I decided this would complement the outside tucks on the sleeves. Again, I wasn't completely thrilled with this solution, but it was better than the gaping.

Conclusion

Wow, I can't think of the last time a garment gave me such trouble. The pattern is good and I'd like to use it again, but I will be more careful if I use silk organza again. Problem is, I do want to use it again. ;)

Now that I've finished my "evening" holiday look, all that is left is my daytime holiday look. I plan to start this weekend on that. :)

Closeup of outside sleeve tucks

Time to Par-tay!

Closeup of felted flower. (Post on how I made it here.)

By the way, if anyone spies how Thakoon used this fabric, I'd love to see a pic!