Saturday, May 29, 2010

No Jacket for YOU!

I really need jackets. And coats too. Really really. I have been admiring this Marcy Tilton jacket pattern, then admiration turned to covet when I saw Dorothy's, Dolcevita's, and sew2little's versions on PatternReview. I was concerned about the horizontal seam that runs just under the bustline, but, hey, I was able to modify the Heart's A'Flutter top to fit me, wasn't I?

After studying the pattern and looking at the finished measurements, I decided cut out the pattern tissue in a size 22. This pattern appears to be a bit more close-fitting than other Marcy Tilton tops, because I would usually use a smaller size. I pinned the tissue together for an initial trial, before adding the bust dart.

Yowza. My bust point was far lower than the pattern. In fact, I would have to lower the horizontal seam across the front by SIX inches and the back would require further alterations. Maybe it would be easier to get a bust reduction. ;)

Oh well. I don't really want to spend the whole weekend adjusting the pattern, though I think this design could be very flattering if I could get the fit right. Meanwhile, I'll admire it on the Dorothy's of the world and I'll have to find another use for my stretch denim and Riri zipper.

By the way, I've met Dorothy and she's even more gorgeous in person! :)

On another note: I have had a couple reports that folks are having trouble leaving comments on my blog. I have it set to accept comments from anyone, even anonymously, so I am confused. Is this happening to others? If you aren't able to leave a comment, please let me know via email. Not sure what I can do, other than complain to the overlords, but I would like to know.

Thursday, May 27, 2010

Sewing Workshop - Haiku Jacket

Buying fabric online has its inherent risks, but I mostly have been happy with my internet purchases. I like great denims, and when I saw this reversible denim on Gorgeous Fabrics, I loved it. It was called Reversible Soleil Denim, a perfect name for the stylized suns on the reverse side of the fabric and I had several jacket/coat ideas for it.

I bought the fabric, well before Christmas, on sale. When it arrived, I was a bit surprised how thick and stiff it was. The description on the website didn't clue me in. Think of the stiffest pair of jeans you have ever struggled to hem.

This denim is stiffer.

I have never before seen, or sewn, denim as stiff as this. But, it is gorgeous. :)

For several weeks, I threw the fabric into every dark load of laundry. I washed and dried it at least ten times. I abused it at much as possible, by throwing in tennis shoes, for example, but any softening was negligible. This denim wouldn't work for the designs I had in mind so, after showing it to a couple of friends, I reluctantly put it away.

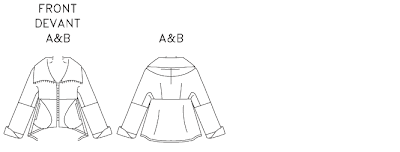
One friend had mentioned she thought it might be a suitable fabric for the Haiku or Haiku Two jacket, from Sewing Workshop. That wasn't how I envisioned the project, so I forgot about it. When I recently unearthed it, I was determined to use it for a jacket of some sort. (I really need jackets!) I went through all of my patterns and, wouldn't you know, I decided to use the Haiku pattern, largely because it would feature the wonderful reverse side on the lapel. I guess she was right, after all. :)

The Haiku Jacket is officially out of print, but copies are still available through independent sellers, such as Vogue Fabric Store, and it shows up occasionally on ebay. The reason I chose the Haiku, instead of the Haiku Two (which I also own and is still in print), is because it is longer and less flared – it had more of the silhouette I wanted.

This is an older Sewing Workshop pattern, meaning the sizing is very generous. It is difficult to measure the flat pattern, but I was pretty sure that the small would work for me, so I made a muslin of the small. Other than being a tad long (which I decided to leave as-is), the Small was a perfect fit. In the Big 4 patterns, I generally wear an 18 or 20 on top, and usually add an FBA, so a Small (without FBA or any alterations) is generous indeed. And how rare is it for me to make something out of the envelope without any alterations at all???!! Pretty nice. :)

While this isn't a hard pattern to sew, exactly, it uses flat felled seams throughout, which was a challenge in this stiff fabric. However, the flat fell seam was an appropriate finish for denim, so that is what I used. Anyone who has sewn much with Sewing Workshop patterns is familiar with their wide hems made using oak tag templates and their generous use of mitered corners. This pattern was created before those techniques were adopted, but I used them anyway. The miters were especially important to minimize bulk in this very dense fabric and I used them on the bottom of the pockets, as well as on the bottom of the back facing.

The changes I made were minimal:

  • I omitted all interfacings (not needed!)
  • I omitted the rectangular reinforcements sewn on the inside at the top of the pockets.
  • I sewed the sleeve facings on inside out, so when I roll back the cuffs, you will see the reverse of the fabric.

Trying to sew seams that went across flat felled seams involved many layers of the thick denim. This is a good time to get out one of those "hump jumpers" or "thing-a-ma-jigs", if you have one, which I don't. When my presser foot was in the air, going over these thick spots, I folded a denim remnant several times and placed it behind and under the presser foot. A much cheaper, and more convenient, solution. I also made heavy use of my tailor's clapper during construction to tame the fabric, which was fairly resistant to laying flat when pressed. I was hoping to complete the jacket without breaking any sewing machine needles but, towards the end, when I was sewing the very challenging flat fell seam along the shoulder/top of sleeve (which is the last flat fell seam I had to sew), I broke the needle when going over many layers of the denim. Though I only lost one machine needle, many straight pins died in the construction of this jacket.

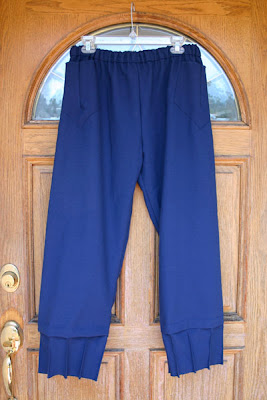
Detail on the inside, showing some of the flat fell seams and the sleeve facing.

Even before hemming the jacket, which I did early in the process of construction, I realized that the design was going to expose a bit of the solid blue denim at the bottom of the turned back lapel. I saw a few possible solutions to this problem, none of which excited me:

  1. Hem normally, causing the blue to show at the bottom of the lapels.
  2. Hem in the reverse direction, causing the suns to show at the bottom of the jacket, all the way around (except at the lapels).
  3. Bind the hem, which still presents the artifacts of the first two solutions, depending on which side of the fabric the binding uses.
  4. Don't hem the jacket, but use a zigzag or serged edge. (Though my serger is currently capable only of the regular overlock stitch.)
  5. Where the lapel folds back, change the direction of the hem. This didn't thrill me either, since I would have to slice the denim the width of the hem – it wouldn't be a clean finish.

After due consideration, I used the first option, but I am not loving that bit of solid blue that shows at the bottom of the lapels. Do any of you have a better suggestion? I even considered hand tacking on a bit of the "sun" fabric to cover up the solid blue - sort of a informal applique. When I looked through the Haiku gallery on the Sewing Workshop page, looking for other possible solutions, I realized that the posted samples either used a fabric where the front and back are virtually the same, or else didn't use the folded back lapel. Since I mainly chose this pattern to feature the reverse fabric on the fold-back lapel, this is a bit of a disappointment.

Despite the stiffness of this fabric, I do like the finished jacket. It's perfect for throwing on and running errands or taking a walk and, hopefully, it will soften up over time. I may make this pattern again, but next time would use a drapey fabric that is the same (or mostly the same), front and back.

This is one of those very rare times when I like the garment better on me than on the hangar. Unfortunately, I have no photographers available at the moment, so it will have to wait until another day.

Friday, May 21, 2010

Day 'O Fun - Yeah, it's Sewing Related :)

Today is a good friend's birthday (Happy Birthday, Renee!!!) so I took a few hours off work so the two of us could attend the San Francisco Bead and Design Show near the city's shopping district. Besides beads and jewelry (and the occasional button or purse handle...) there are a few designers at this show. One who produces nuno felted pieces, another who produces beautiful handwoven pieces, another who produces garments from a variety of fabrications, and the like. There is a designer we like and she has a booth at this show.

I was wearing my top with Marcy Tilton neckline and my Au Bonheurs pants and I wasn't in her booth for 15 seconds before the designer complimented the pants and asked, "Whose pants are those?" I resisted the immature response, "Mine", and told her about Au Bonheurs patterns and she asked me to write the name down. I think I've made another fan of those patterns. :)

I was very restrained and bought only a necklace at the show, but my friend found several beautiful pieces and, she deserved them. :) The show runs through Sunday so, if you are in the Bay Area, it costs only $10 for the 3-day run.

Shams says check it out. :)

Sunday, May 16, 2010

Report - Center for Pattern Design Workshop

Yesterday, I took an all-day class, offered through the Santa Rosa branch of the American Sewing Guild. (I'm not a member, but I'm thinking maybe I should join. :) )

This class, taught by Sandra Ericson, of the Center for Pattern Design, was called Your Proportion, and examined clothing from the perspective of a body's proportions.

We started with a slide show/lecture explaining the importance of proportion, the Golden Mean, and the ideally proportioned body. She gave us instructions on how to capture your own silhouette, then we broke into teams and taped huge pieces of paper to walls, windows, doorways, and proceeded to gather the necessary points to create a personal croquis. After connecting the points with straight lines, we drew an "ideal proportion" grid over the life size silhouette and transferred it to a graph on an 8x11 piece of paper. On the small croquis, it was now possible to see where our bodies differed from the "ideally" proportioned body.

What a fascinating exercise, and one I'd wanted to do for a long time.

Especially recently, I have been trying to figure out what sorts of clothing most suits me. When I first returned to sewing, I was focusing on tops and skirts. I tend to like longer skirts, but I also like longer tops and, of course, these don't generally work together. So I'd made a few shorter, more close-fitting, tops that I could wear with skirts or fuller pants. Because I have thin legs and hips, I also tended to wear pants that skimmed my legs, but one or two friends had mentioned that I needed pants with more fabric at the hem to create a more balanced look. From the photos taken for this blog, I could see that this is true – in narrow pants I had the silhouette of an ice cream cone in danger of toppling over. I have been thinking a lot about this lately, trying to figure out which path I should follow with my wardrobe.

So, what did I learn from creating a personal croquis? I learned that my shoulders, which I always thought so narrow, are actually fairly ideal, for my height. (Note, they are narrower than my bust, but for my height, they are only a shade narrow.) My hips are also a shade narrow for my height, but only a tiny amount. So, basically, my shoulders and hips are fairly "ideal", in terms of proportions. Not surprisingly, my waist is much larger than the "ideal" and is the same width as my shoulders and hips. (The ideal waist is half the width of the shoulders. HA! Not one of the 30 women there had the "ideal" waist.) That describes my proportions, horizontally.

Vertically, my bustline is far lower than the ideal. Even with my really good, really expensive, really supportive bra. My waist is also lower than the ideal – I am quite short-waisted. (No surprise there.) My hips are just a tad lower than the ideal, and my knees are higher than the ideal, so I guess I have short thighs and long calves. I knew my legs were short, but I didn't realize the shortness was in my thighs, but my calves are actually quite long. :)

At lunchtime, Sandra offered some personal suggestions for my body. She suggested that I get a shorter haircut, with more height to it, to help balance my body. She also said she couldn't overstress how important it was for me to focus on my shoulder line. That I should bring my shoulder line "up and out" and use it as a focal point. She said it would greatly help to balance my bust. She also said the hips would be a good focal point for me, and that an asymmetrical line is very good for me – especially tops/jackets that button off center. It's handy that I love asymmetric looks. :)

In the afternoon, we came back together for a lecture on the aspects of proportion. We started by looking at the ideal silhouette for our personal proportions, but then we talked about the impact of interior design lines, and creating a focal point. We learned about the proportion of texture, color, rhythm. It was a semester's course shortened to a few hours, so my head was spinning afterward. She talked about necklines, fabric choice, shoes, hairstyle. Thank goodness I took notes to go back over and study. :)

We had been asked to bring 8 or 10 pages torn from a magazine, to show looks we though would be good for us. Unfortunately, we ran out of time before we could really do much with them, but I guess that is left as homework. :)

All in all, a great workshop, giving me much to chew on. I know of sewists who travel far and wide to take of Sandra's workshops – for example, her Vionnet classes. I just might have to keep closer tabs as her Center for Pattern Design is located in St. Helena, which is only an hour or so away from me. :)

Thursday, May 13, 2010

Vogue 8397 - Marcy Tilton Pants

This Marcy Tilton pant pattern has been fairly popular on Pattern Review, especially View C. View C is a pant with no side seam. I have been wanting to make it but my first rendition doesn't use the pattern as designed. Instead, I decided to try out a version Marcy has shown on her website. Here are her two versions (click the pictures to take you to her pages):


As you can see, Marcy has changed the pant detail at the hem. According to her page, she has created three 1/2" darts at the hem, tapering to nothing. From looking at the picture, I assume she has also put 3 corresponding darts at the back. When I made my pants this way, tapering them to nothing inside of the horizontal pleat, and tried them on, they looked unbalanced on my body, so I ripped the darts out and replaced them with 1/4" darts, tapering them to nothing about 1/2" away from the pleat. I also put a dart where the side seam would be and on the inside seam, so there were 8 in all, rather than six. I liked this look better.

The fabric selvedge serves as the hem of the pant.

The other detail Marcy has changed is the addition of the funky patch pocket. She gives a tutorial for creating this pocket. I created a template using her measurements and made the same pocket. That is the fabric selvedge at the top of the pocket.

My fabric is a navy linen/poly blend from Fabrix. I have enough to make another pair of summer pants and I'm thinking another pair of Marcy's panel pants with the horizontal pocket. :)

Tuesday, May 11, 2010

DVD series - The House of Eliott

I am sitting here, in a noisy Starbucks, while my van is nearby being serviced for a recall which is required before I can renew my vehicle registration for this year. I am trying to work, which isn't easy in this highly distracting environment, so I thought I would post a quick entry on my most recent obsession.

I love BBC programs and have watched them for years. But, somehow, I completely missed this one. The copyright date is 1991, and I had my first child in 1992, so I guess when it arrived in the U.S., I was preoccupied with nesting and/or breastfeeding. Luckily, a friend mentioned it at our recent sewing retreat. Still, I didn't act on it immediately. When I eventually looked it up on Amazon, I discovered the series is pretty expensive, so I joined Netflix just to see it.

The House of Eliott.

swoon

I have now watched the first 9 episodes and it is fabulous. How does this relate to sewing? Well, it begins in London in 1920, where you meet two sisters who were raised by a deceitful, tyrannical, despot of a father, who is also a successful doctor. You never see him, but he is very Scrooge-like, and does his best to ruin the happiness and prospects of his daughters. He dies, leaving them virtually penniless, with a male cousin in charge of their finances and as guardian for the youngest, who is 19. The eldest is quite a bit older and could have been the guardian/executor, but the doctor clearly thinks little of females. This cousin, a solicitor, is one of those arrogant, self righteous sorts who thinks he knows best, so he hides facts, and money, from the two sisters.

The only real skill these girls have (because their father would not give them a proper education) is sewing. The youngest, in particular, has a gift of design. Eventually, these two open a fashion house and there are many scenes which revolve around the world of society and the garments they create.

I am only 9 episodes into the first season, but I am loving it. Each time I pop the DVD into the mail, I wait with bated breath for the next one. Luckily, because Netflix is *so* fast with the shipping, I usually get it in a couple of days.

I highly recommend it.

OK, now back to work. :)

Sunday, May 9, 2010

Sewing Workshop - Teagarden T and Trio pants

To those of you who celebrate Mother's Day, I hope you had a good one!

Eldest Daughter is off in Washington for a week and a half for a ballet "thing", so the burden of celebrating fell onto Youngest Daughter. She did herself credit, though, by taking me for my first pedicure in 10 years. Yup, I remember the last time was on a cruise to Alaska. I pity the poor technician that had to deal with my extremely unkempt feet and I told daughter to make sure to give her a good tip. :)

Afterward, DD2 and I had a great lunch, and even ended up at my favorite fabric store. Some of our other plans got a bit derailed when DD2 was invited to a last minute birthday party for a friend visiting from Holland, but I enjoyed a long nap. What's not to love?

I have a new outfit made from TNT (Tried 'N True) patterns. The top is a Teagarden T, one of my favorite Sewing Workshop patterns. I declared that I would probably make 20 of these, and this is number three (not counting the muslin). It is made from a cotton interlock from Britex. I have #4 cut out as well.

I have been wanting to make some cream linen pants, but I was very nervous about it. It's been years since I've had any white or cream pants – they seem so impractical! But I found this gorgeous Dana Buchman fabric from Fabric Mart in cream; it's 65% rayon, 30% linen, and 5% silk. I threw it into the washer and dryer a couple times and it came out beautifully, but the second time I added a light blue linen and it came out of the dryer with lavender spots sprinkled all over it. I washed it a third time, with bleach, but it didn't seem to help the spots.

I decided to use another new favorite pattern, the Trio pants (I think this is number three from this pattern as well). I cut around the worst of the spots, but there are very light spots that I hope are mostly invisible. If, later, the pants develop further stains, I may dye them a darker color. But for now, I love these pants! I was planning to buy more of the fabric, it was on the website for a long time, but, of course, it's sold out now, except in peach.

Youngest daughter took these photos of me today. In the second one, she asked me to do a Kung Fu pose. I did my best. ;)